Raspberry Pi in the NoIR - Part V - test the OS
- Jasmine
- May 19, 2020
- 2 min read
Updated: May 20, 2020
If you don't know what this blog is about, go to Part I to find out.
So, you have reformatted the SD, assembled the Pi and the lights to make it nocturnal. Now let's test the OS and install the motion detection software.
Check the OS and configure:
Charge up one of your power banks and connect it to the Pi board via the 5V micro USB. You will see a couple of small lights on the Pi board turn on. You will also need an ethernet cable to connect to your internet source.

Open a Mac Terminal window (or equivalent). Wait 90 secs or so from the time you connected to the ethernet cable and then enter:
> ping raspberrypi.local
This 'ping' is basically sending out a message to ask 'hey, anyone there?' The response given back should be your Raspberry Pi unit IP address.

You can see that the number I was given is 10.0.0.102. Yours will be different.
Now you have the IP address, you can ssh into the Pi unit itself. What is ssh you ask? Excellent question! Go here to read more on ssh.
Initially, your user name will be pi and you will use the factory default password of raspberry.
> ssh pi@10.0.0.102
Remember to change to your IP address. Enter the default password when prompted. You will know when you are connected to the Pi because the host name line will change (see below).

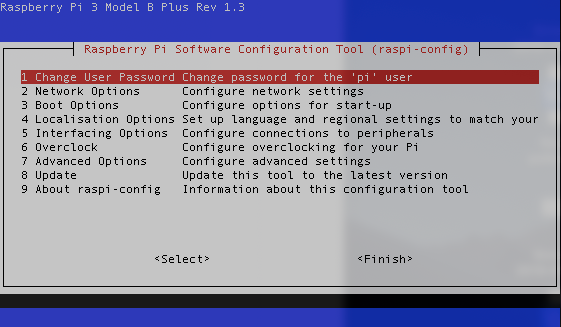
Next, we need to access the OS configuration settings. This needs root privileges.
> sudo raspi-config
Use the arrow keys and enter to select specific configuration settings. Change the password so it is no longer the default 'raspberry' by selecting option 1 and typing a new password.

Expand the file system by selecting option 7, then A1. Enable the camera by selecting option 5, then P1, then 'enable camera interface'. Change the name of your unit via option 2. Change the timezone settings via option 4, then I2. Go to 'Finish', using the left/right arrow keys, hit enter and allow the system to reboot.
Check you can log back in.
> ssh pi@10.0.0.102
Now update and upgrade everything by selecting option 8. Once that finishes, you can begin installing the motion capture software.
Install motion capture:
I'm using Pikrellcam as Rob Lanfear, Michael Whitehead and Kate Umbers did. There are other options though such as Motion and OpenCV.
Connect to the pi unit with the ssh command. Then:
> cd ~
> git clone https://github.com/billw2/pikrellcam.git
> cd pikrellcam/
> ./install-pikrellcam.sh
At this point you may be asked questions. Port = 80. Autoboot = yes. Password = enter your password.

The motion detection software should be installed. To check this, open a web browser and type in:
> http://pi@10.0.0.102
Enter the username and password for your unit when prompted.
You should now see a webpage that looks something like this one (image from Vince.Patronweb.com).

Clicking on each of the tabs will allow you to configure the motion detection camera setup. Settings that I changed included:
Setup tab = config tab = 1 = motion on; confirm gap 5; pre-capture 5; event_gap 10; post_capture 2; video limit 120 secs; motion stills off; max stills 30.
Setup tab = config tab = 2 = video res 1080 (high)
That's it! You now have motion detection software installed and operational. Now let's set up the wireless connection.

Comments